Creating incidents
- b.belokur Белокур Богдан (Unlicensed)
- Former user (Deleted)
- Tetiana Bondar
Why all this, I have a Jira REST API, right?
Once the connection is established, you will have access to a REST endpoint to create/edit incidents. When creating incidents, 2 parameters are mandatory: event identifier and rule. Rules are required to identify the cause of the event. You can read more about rules here. The REST API that exists in Jira is enough to create incidents/issues. But Alert Catcher has several advantages. We will consider some of them in more detail.
Binding to an event identifier from a third-party system
For example, you created an incident, it has an ID of 777-XXX in your system. After a while, the incident on your third-party system ceased to be relevant, it was resolved or perhaps the data was updated.
In order to update the incident data in Jira, you need to find the incident ID 777-XXX in the list of all project isues or store key value pairs somewhere (the incident ID matches the Jira issue key). This issue is taken over by Alert Catcher. You can update the status of the incident, knowing only its identifier.
API-key
Unlike the Jira REST API, where you use Bearer auth to authenticate the user to create the issue, in Alert Catcher you specify a separate API-key parameter in the request header.
Even if an attacker gets your API key, he will not be able to use it to call any other REST API methods.
Default issue type, reporter and project
Since in the connection settings you have already specified the default incident reporter, the project to which incidents will be created and the issue type, you don't need to specify this setting each time you send a request.
Restrictions on Incident Creation
Alert Catcher allows:
- limit the creation of incidents to only one IP address
- create incidents using the GET http method by passing the incident parameters to url. Such cases are quite rare, but Alert Catcher solves this problem.
- create incidents with content type JSON or FORM-URLENCODED
REST-resource and API-key
To view the REST resource for creating incidents, click the Connection settings tab.
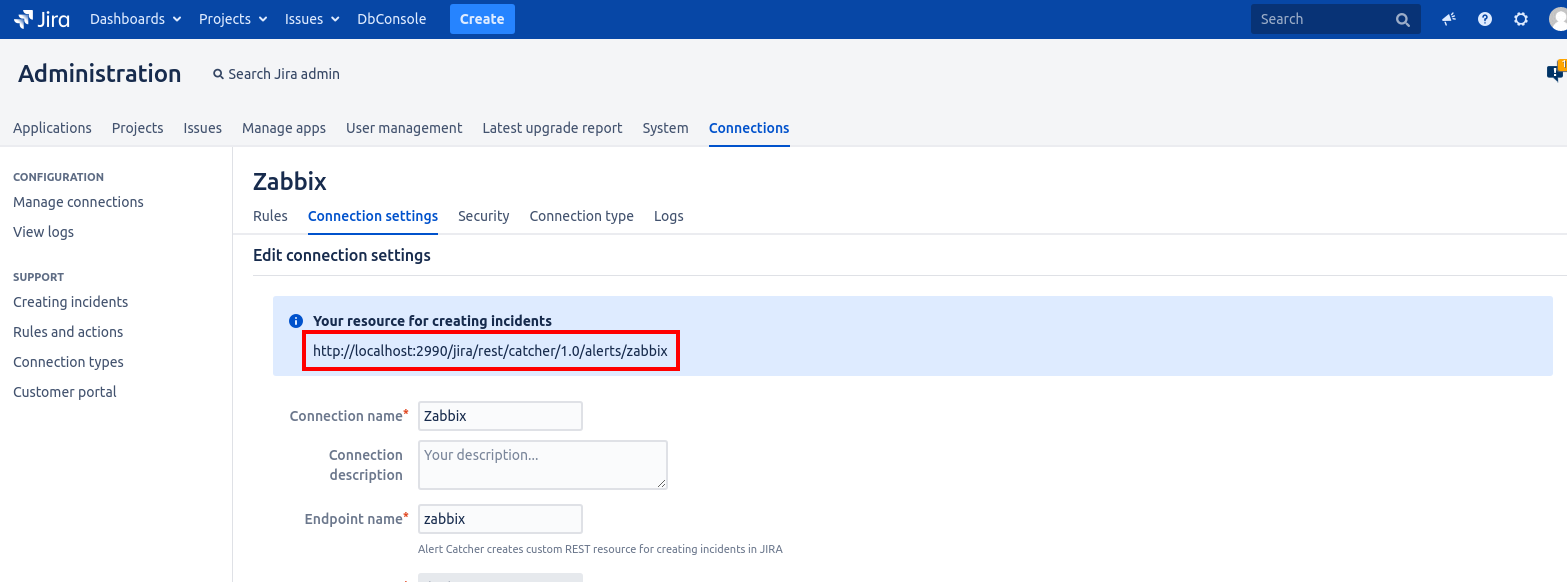
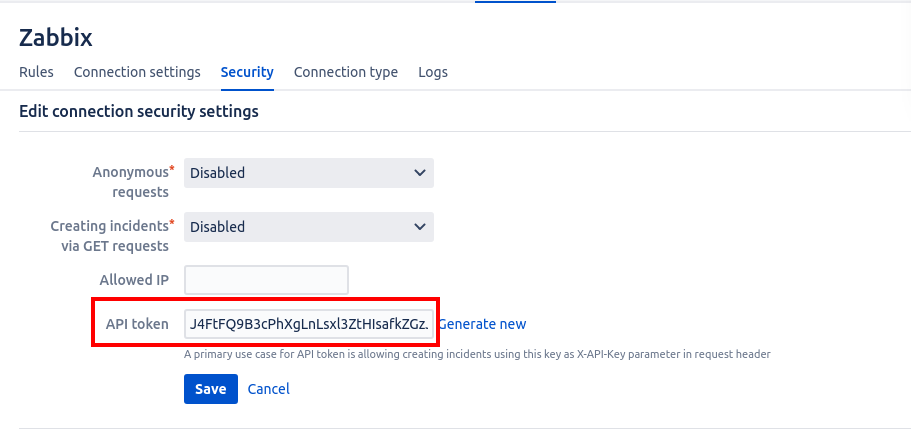
You will also need an API-key. You can get the API-key on the Security tab:
Incident creation
This page shows examples of how to create incidents and update them by ID. You set up the transmitted values by yourself.
All scripts listed in the example below will create the issue in Jira. Default connection for all example is Zabbix.
JSON POST request
To create an incident, send a POST request to the endpoint specified on the connection settings page.
Example of request
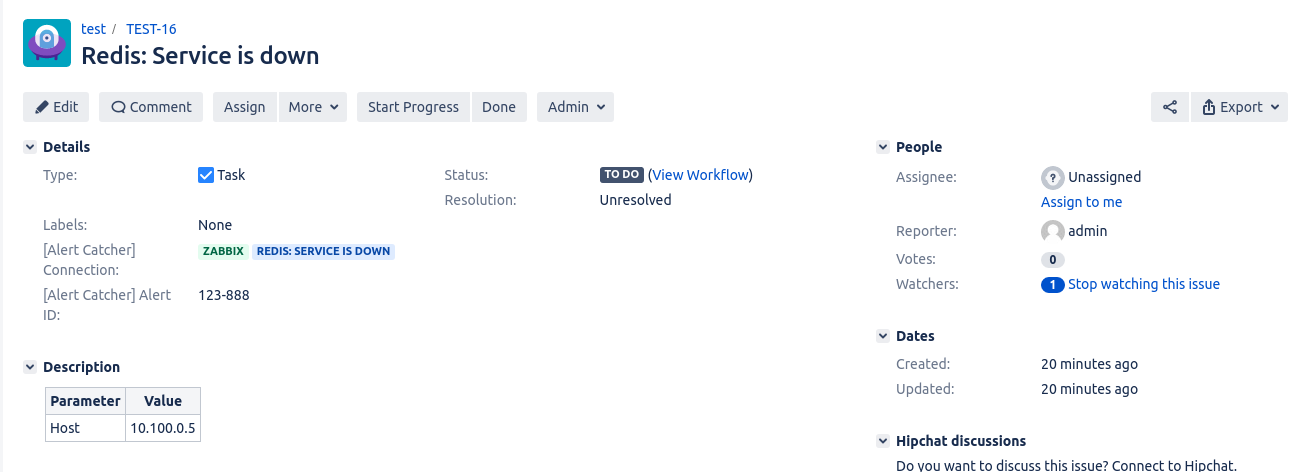
This request will create an incident on behalf of the user specified in the connection settings.
curl --request POST \ --header 'content-type: application/json' \ --header 'x-api-key: <your api-key>' \ --data '{ "id": "123-888", "rule": "Redis: Service is down", "params" : { "Host": "10.100.0.5" }}' |
Request headers
- content-type: application/json
- x-api-key: your api-token from the Settings section
JSON parameters of the request body
![]() - mandatory fields
- mandatory fields
- id (String) - a unique incident identifier that is provided by a third-party system.

- rule (String) - a sign by which an incident was created and which can be used to group incidents. More detailed information about the rules can be found here.
- params (Object) - incident parameters (key/value). If there is a key with the field name on the issue creation screen, the value will be assigned to that field. The other values will be added to the table in Description.
- issueType (String) - the name of the issue type in the project with which the incident will be created. If this field is not specified, an incident will be created with the issue type that is specified in connection settings.
- reporter (String) - the login of the user that will be specified in the issue as reporter. If this field is not specified, then an incident will be created with the request reporter, which is specified in the connection settings.
- isProblem (Boolean) - a parameter that indicates whether the current incident will be a problem. This is necessary in a situation where you want to create a problem regardless of the settings rule actions.
Form data POST request
You can also use form-urlencoded (for example, if you send a request with Paessler PRTG).
Example of request
This request will create an incident on behalf of the user specified in the connection settings.
curl --request POST \ --header 'content-type: application/x-www-form-urlencoded' \ --header 'x-api-key: <your api token>' \ --data id=123-888 \ --data 'rule=Redis: Service is down' \ --data Host=10.100.0.5 |
Request body parameters
![]() - mandatory fields
- mandatory fields
- id (String) - a unique incident identifier that is provided by a third-party system.
- rule (String) - a sign by which an incident was created and which can be used to group incidents. More detailed information about the rules can be found here.
Other parameters you pass as key value in the request body. If there is a key with the field name on the issue creation screen, the value will be assigned to that field. The other values will be added to the table in Description.![]()
Request headers
- content-type: application/x-www-form-urlencoded
- x-api-key: ваш api-token from Connection Settings
Transfer of parameters via GET request
You can also create an incident using the GET request. Although it is not correct to use this method to create new entities, Alert Catcher provides this feature as well. To activate this feature, go to the Security tab and change the Create via incidents GET requests and Anonymous requests values in Enabled.
Example of request
This request will create an incident on behalf of the user specified in the connection settings. (In this example, we're not replacing spaces by %20, for clarity)
All you have to do is follow the link below to create an incident.
https://<my-jira.com>/rest/catcher/1.0/alerts/zabbix?id=123-888&rule=Redis: Service is down&host=10.100.0.5 |
Request URL Parameters
![]() - mandatory fields
- mandatory fields
- id (String) - a unique incident identifier that is provided by a third-party system.
- rule (String) - a sign by which an incident was created and which can be used to group incidents. You can read more about the rules here
The rest of the parameters you transmit as a key value. If there is a key with the field name on the issue creation screen, the value will be assigned to that field. The other values will be added to the table in Description.![]()
Restrictions
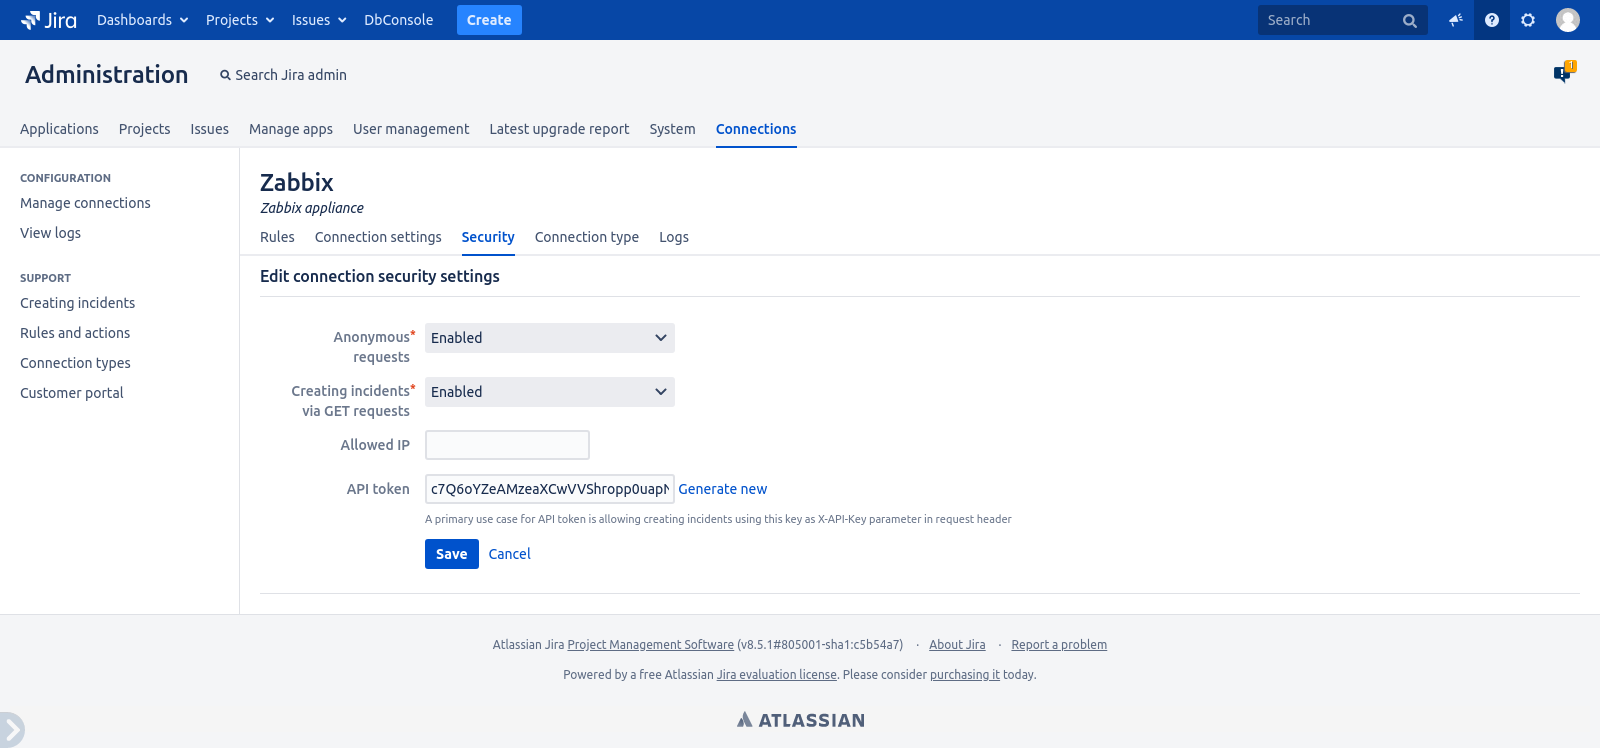
On the Security tab, you can change access and the way incidents are created:
- Anonymous requests - this parameter determines whether the API token should be created when creating an incident
- Creating incidents via GET requests - this parameter defines the ability to create incidents using the GET request
- Allowed IP - Specify the IP address from which the incidents will be sent. Requests sent from other addresses will be ignored.
- API token - authorization key
Update of incident
In this example, the incident with an identifier specified instead of <your-id> will be updated.
curl --request PUT \ --url https://<your jira>/rest/catcher/1.0/alerts/zabbix/<your-id> \ --header 'content-type: application/json' \ --header 'x-api-key: <your api token>' \ --data '{ "id": <your-id>, "rule": "Redis: Service is down", "params" : { "Host": "10.100.0.5", }}' |